Overview
Use the Scheduler to create and manage the schedule for your workplace.
You can access the Scheduler in the When I Work web app at any time by clicking the Scheduler tab at the top of the page.
The schedule
The schedule displays scheduled shifts, annotations, user’s availability preferences, and approved time off.
| Callout | a |
| Name | Annotation |
| Description |
Use annotations to send your staff an announcement, let them know your business is closed, or prevent them from taking time off. Click Annotation button next to a date to add or edit an annotation. |
| Callout | b |
| Name | OpenShift |
| Description |
Use OpenShifts to offer shifts to a select group of qualified users (based on position). Eligible users can pick up OpenShifts that haven’t already been claimed. To schedule an OpenShift, click in the OpenShifts row or drag an existing shift into the OpenShifts row. If there are four or more OpenShifts scheduled for a day in week view, the OpenShifts menu can be collapsed and expanded. |
| Callout | c |
| Name | Unpublished shift |
| Description | Unpublished shifts are not visible to users. You can identify unpublished shifts by their diagonal stripes. |
| Callout | d |
| Name | Published shift |
| Description | Published shifts are visible to employees. All published shifts have solid colors. |
| Callout | e |
| Name | Time off |
| Description | The user has time off. |
| Callout | f |
| Name | Availability preference (preferred) |
| Description | The user prefers to work on this day. Hover your pointer over the triangle to view the user’s preferred hours. |
| Callout | g |
| Name | Availability preference (unavailable) |
| Description | The user is unavailable for some of the day. Hover your pointer over the triangle to view the user’s unavailable hours. |
| Callout | h |
| Name | Availability preference (unavailable all day) |
| Description | The user is unavailable all day. |
| Callout | Name | Description |
| a | Annotation |
Use annotations to send your staff an announcement, let them know your business is closed, or prevent them from taking time off. Click Annotation button next to a date to add or edit an annotation. |
| b | OpenShift |
Use OpenShifts to offer shifts to a select group of qualified users (based on position). Eligible users can pick up OpenShifts that haven’t already been claimed. To schedule an OpenShift, click in the OpenShifts row or drag an existing shift into the OpenShifts row. If there are four or more OpenShifts scheduled for a day in week view, the OpenShifts menu can be collapsed and expanded. |
| c | Unpublished shift | Unpublished shifts are not visible to users. You can identify unpublished shifts by their diagonal stripes. |
| d | Published shift | Published shifts are visible to employees. All published shifts have solid colors. |
| e | Time off | The user has time off. |
| f | Availability preference (preferred) | The user prefers to work on this day. Hover your pointer over the triangle to view the user’s preferred hours. |
| g | Availability preference (unavailable) | The user is unavailable for some of the day. Hover your pointer over the triangle to view the user’s unavailable hours. |
| h | Availability preference (unavailable all day) | The user is unavailable all day. |
Adding shifts
To add a shift, simply click the appropriate cell in the schedule and fill out the shift details.
When you click a cell, you’re presented with the option to use a shift template or create a custom shift.
- If you’ve added shift templates, select a shift template to save time.
- If you need to create a one-off shift or haven’t created any shift templates, click Create Custom Shift.
Shift details
Every shift is made up of the same building blocks.

| Callout | a |
| Name | Assign To |
| Description | (Required) The user working the shift. |
| Callout | b |
| Name | Time |
| Description | (Required) When the shift begins and ends. |
| Callout | c |
| Name | Unpaid Break |
| Description | (Optional) The length of the unpaid (lunch) break that the user should take during the shift, in minutes. If you use When I Work Time & Attendance, you can set up unpaid breaks to automatically deduct from the timesheets. |
| Callout | d |
| Name | Color |
| Description | (Optional) The color for the shift. |
| Callout | e |
| Name | Position |
| Description | (Optional) The position the user will be working, such as barista, cashier, or manager. |
| Callout | f |
| Name | Job Site |
| Description | (Optional) If the shift will take place off-site from your normal workplace, add a job site to let the user know where to go. |
| Callout | g |
| Name | Tags |
| Description | (Optional) Custom shift qualifications that cannot be easily captured by position alone. Tags are additional eligibility requirements that you can layer on top of positions. |
| Callout | h |
| Name | Shift Task List |
| Description |
(Optional) Specialized tasks that need to be completed by a certain user or during a specific shift. These tasks are to be completed by the user scheduled for the shift. For more information, see Setting Up Shift Task Lists. |
| Callout | i |
| Name | Shift Notes |
| Description | (Optional) Instructions or notes for the assigned user. |
| Callout | j |
| Name | Repeat Shift |
| Description | (Optional) Click to set up a repeating shift. |
| Callout | k |
| Name | Save As Shift Template |
| Description | (Optional) Click to create a shift template based on this shift. |
| Callout | Name | Description |
| a | Assign To | (Required) The user working the shift. |
| b | Time | (Required) When the shift begins and ends. |
| c | Unpaid Break | (Optional) The length of the unpaid (lunch) break that the user should take during the shift, in minutes. If you use When I Work Time & Attendance, you can set up unpaid breaks to automatically deduct from the timesheets. |
| d | Color | (Optional) The color for the shift. |
| e | Position | (Optional) The position the user will be working, such as barista, cashier, or manager. |
| f | Job Site | (Optional) If the shift will take place off-site from your normal workplace, add a job site to let the user know where to go. |
| g | Tags | (Optional) Custom shift qualifications that cannot be easily captured by position alone. Tags are additional eligibility requirements that you can layer on top of positions. |
| h | Shift Task List |
(Optional) Specialized tasks that need to be completed by a certain user or during a specific shift. These tasks are to be completed by the user scheduled for the shift. For more information, see Setting Up Shift Task Lists. |
| i | Shift Notes | (Optional) Instructions or notes for the assigned user. |
| j | Repeat Shift | (Optional) Click to set up a repeating shift. |
| k | Save As Shift Template | (Optional) Click to create a shift template based on this shift. |
Copying shifts
To copy a shift, hold the control key (or the command key if on a Mac) and click the shift you want to copy, then drag it to any cell.
As you move the shift around, icons appear to let you know whether eusers are qualified or have conflicts.
- Thumbs up icon means the user is qualified to take the shift (based on position).
- Thumbs down icon means the user is not qualified to take the shift (based on position).
Month view does not support drag and drop.
Reassigning shifts
Click and drag a shift to move it to a different user.
As you move the shift around, icons appear to let you know whether users are qualified or have conflicts.
- Thumbs up icon means the user is qualified to take the shift (based on position).
- Thumbs down icon means the user is not qualified to take the shift (based on position).
Month view does not support drag and drop.
Publishing
Shifts are not visible to your employees until you publish the schedule. When the schedule is finished, click Publish & Notify in the top-left corner of the Scheduler.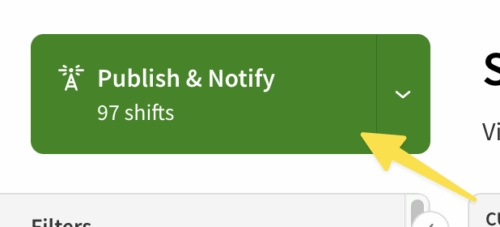
For more details, see Publishing the Schedule.
Views
Scheduler views allow you to build the schedule a day, week, or month at a time for each schedule. You can also switch to positions view if you prefer to build the schedule based on which positions need to be filled.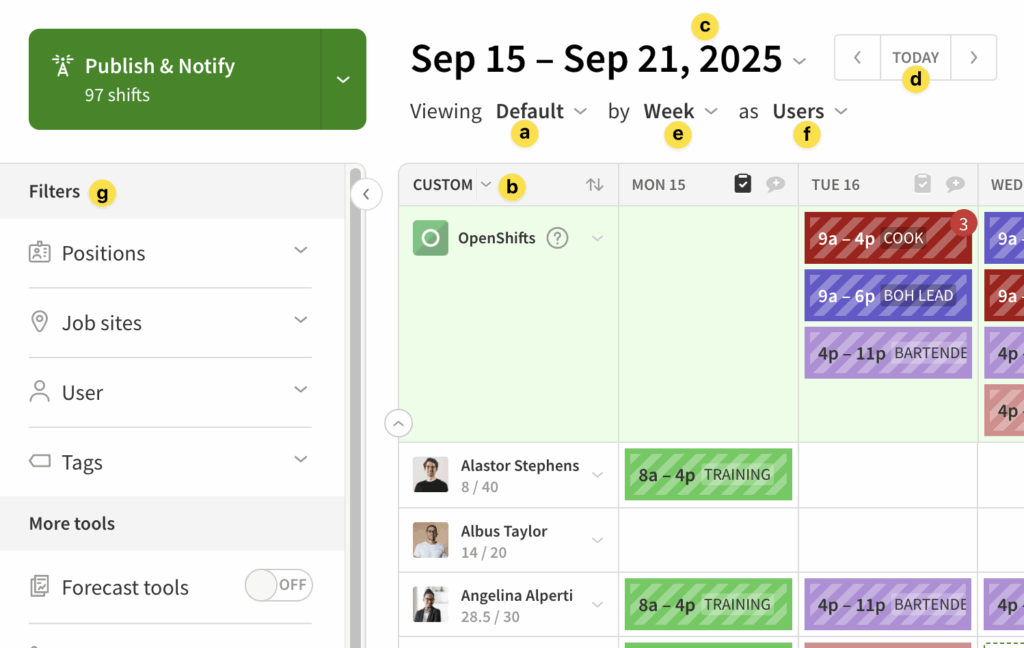
| Callout | a |
| Name | Viewing |
| Description | Click the icon to switch between the separate schedules. |
| Callout | b |
| Name | Users Sort |
| Description | Sort users in the users view. Choose between the following options:
|
| Callout | c |
| Name | Date(s) |
| Description | Click the date(s) or the icon to the right of the date(s) to switch the date(s) being viewed. |
| Callout | d |
| Name | Today |
| Description | Click to return to today’s schedule. |
| Callout | e |
| Name | By |
| Description | Click the icon to the right to switch between day, week, two week and month view. |
| Callout | f |
| Name | As |
| Description | Click the icon to switch your view between user, position, job site, and coverage. |
| Callout | g |
| Name | Filters |
| Description | Use the options here to customize your view of the Schedule |
| Callout | Name | Description |
| a | Viewing | Click the icon to switch between the separate schedules. |
| b | Users Sort | Sort users in the users view. Choose between the following options:
|
| c | Date(s) | Click the date(s) or the icon to the right of the date(s) to switch the date(s) being viewed. |
| d | Today | Click to return to today’s schedule. |
| e | By | Click the icon to the right to switch between day, week, two week and month view. |
| f | As | Click the icon to switch your view between user, position, job site, and coverage. |
| g | Filters | Use the options here to customize your view of the Schedule |
Filters
Use filters to help you focus on the schedule for a particular position or job site.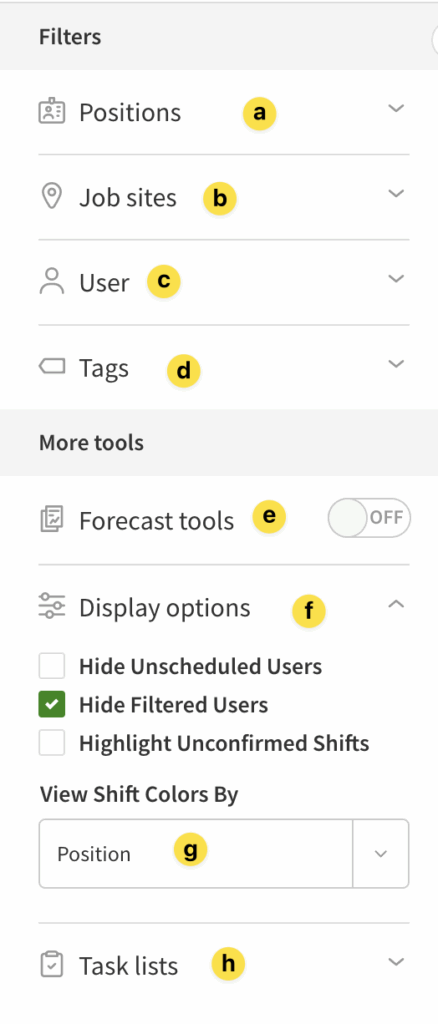
| Callout | a |
| Name | Positions |
| Description | Show and hide shifts based on position.
|
| Callout | b |
| Name | Job sites |
| Description | Show and hide shifts based on job site.
|
| Callout | c |
| Name | User |
| Description | |
| Callout | d |
| Name | Tags |
| Description | Show and hide shifts based on tags.
|
| Callout | e |
| Name | Forecast tools |
| Description | Toggle Forecast Tools to display labor costs on the schedule. Enter projected sales for each day to compare daily labor costs with daily revenue. |
| Callout | f |
| Name | Display options |
| Description | Use the selections in Display options to filter the schedule.
|
| Callout | g |
| Name | Color picker |
| Description | Use the View Shift Colors By drop down menu to color code the schedule by:
|
| Callout | h |
| Name | Task lists |
| Description | View, edit, and create new task lists for your schedule. |
| Callout | Name | Description |
| a | Positions | Show and hide shifts based on position.
|
| b | Job sites | Show and hide shifts based on job site.
|
| c | User | |
| d | Tags | Show and hide shifts based on tags.
|
| e | Forecast tools | Toggle Forecast Tools to display labor costs on the schedule. Enter projected sales for each day to compare daily labor costs with daily revenue. |
| f | Display options | Use the selections in Display options to filter the schedule.
|
| g | Color picker | Use the View Shift Colors By drop down menu to color code the schedule by:
|
| h | Task lists | View, edit, and create new task lists for your schedule. |
Filter indicators
If you have filtered the schedule, you can see what is filtered by looking for a red dot next to the filter heading.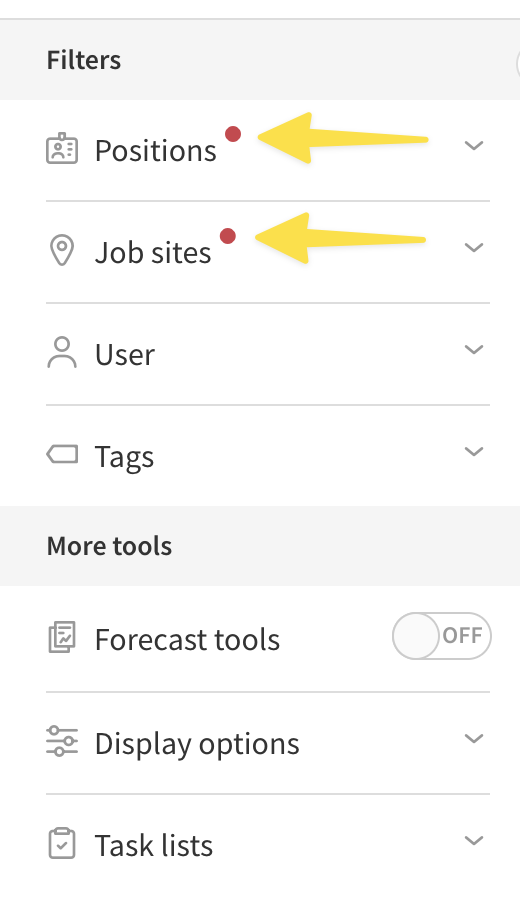
If the filters menu is collapsed, the red dot appears next to the expand button to notify you that items have been filtered.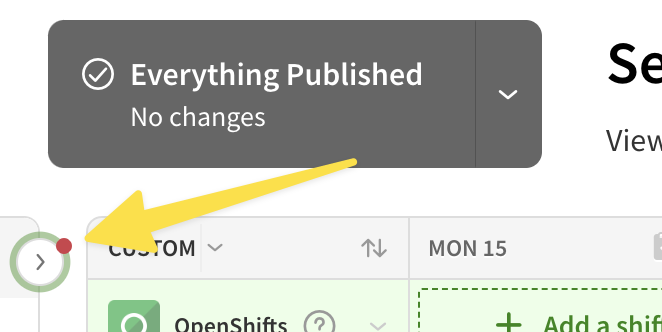
Tools
The Scheduler tools provide advanced features like budget planning, printing, templates, and export.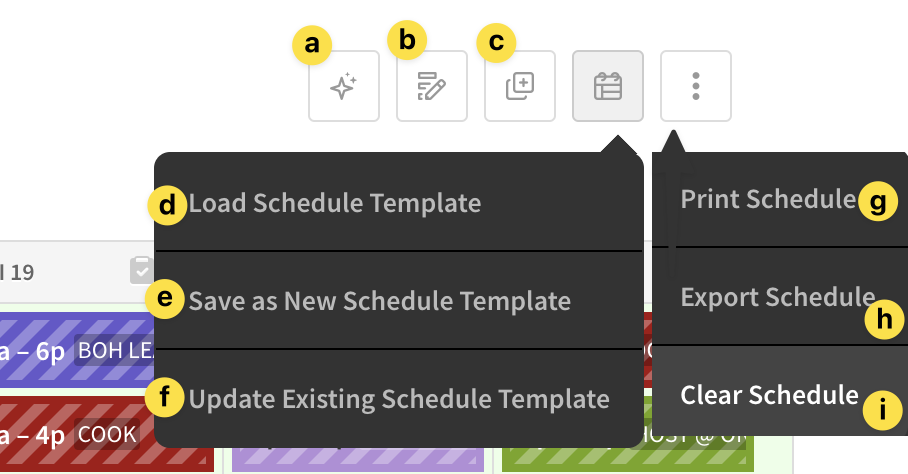
| a |
| Auto-Assign |
| Click to Auto-Assign shifts to your schedule |
| b |
| Bulk Edit Shifts |
| Click to edit multiple shifts in the scheduler. |
| c |
| Copy Previous Day/ Week |
| Click to copy the schedule from the previous day/week to the schedule you’re currently viewing. |
| d |
| Load Schedule Template |
| Click to load a previously saved schedule template. |
| e |
| Save Schedule Template |
| Click to save this schedule as a template so that you can save time by quickly recreating it again. |
| f |
| Update Existing Schedule Template |
| Click to update an existing schedule template. |
| g |
| Print Schedule |
| Click to print the schedule or save it as a spreadsheet (XLS format). |
| h |
| Export Schedule |
| Click to export the schedule to a spreadsheet file. |
| i |
| Clear Schedule |
| Click to remove all shifts from the current view. |
| Callout | Name | Description |
| a | Auto-Assign | Click to Auto-Assign shifts to your schedule |
| b | Bulk Edit Shifts | Click to edit multiple shifts in the scheduler. |
| c | Copy Previous Day/ Week | Click to copy the schedule from the previous day/week to the schedule you’re currently viewing. |
| d | Load Schedule Template | Click to load a previously saved schedule template. |
| e | Save Schedule Template | Click to save this schedule as a template so that you can save time by quickly recreating it again. |
| f | Update Existing Schedule Template | Click to update an existing schedule template. |
| g | Print Schedule | Click to print the schedule or save it as a spreadsheet (XLS format). |
| h | Export Schedule | Click to export the schedule to a spreadsheet file. |
| i | Clear Schedule | Click to remove all shifts from the current view. |
User options
The user options display information about each user, allow you to update user information, and make quick updates to user’s schedules.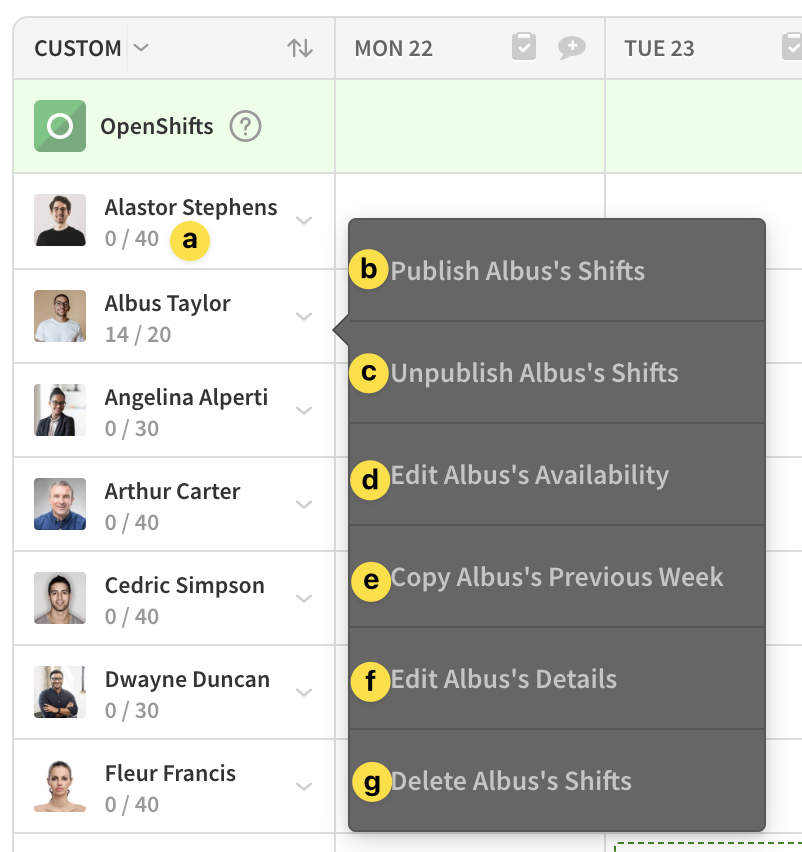
| a |
| N / N |
The user’s scheduled and maximum hours.
|
| b |
| Publish [user]’s Shifts |
| Click to publish the user’s shifts. |
| c |
| Unpublish [user]’s Shifts |
| Click to unpublish the user’s shifts. |
| d |
| Edit [user]’s availability |
| Click to update a user’s availability preferences on their behalf. |
| e |
| Copy [user]’s Previous Day / Week |
| Click to copy the user’s shifts from the previous day/week to the schedule you’re currently viewing. |
| f |
| Edit [user]’s Details |
| Click to update the user’s positions, access privileges, schedules, wages, and other details. |
| g |
| Delete [user]’s Shifts |
| Click to delete user’s shifts on the current view. |
| Callout | Name | Description |
| a | N / N | The user’s scheduled and maximum hours.
|
| b | Publish [user]’s Shifts | Click to publish the user’s shifts. |
| c | Unpublish [user]’s Shifts | Click to unpublish the user’s shifts. |
| d | Edit [user]’s availability | Click to update a user’s availability preferences on their behalf. |
| e | Copy [user]’s Previous Day / Week | Click to copy the user’s shifts from the previous day/week to the schedule you’re currently viewing. |
| f | Edit [user]’s Details | Click to update the user’s positions, access privileges, schedules, wages, and other details. |
| g | Delete [user]’s Shifts | Click to delete user’s shifts on the current view. |