Overview
Instead of viewing your entire schedule, filtering helps you narrow your schedule down to the shifts you want to see. You can filter the schedule in the web application on a computer or in the mobile applications on Android and iOS.
Some filtering options below will not be available for Employee users in the account.
Filtering on a Computer
Hotkey filter options
When in the Scheduler on a computer, typing specific letters will allow you to filter your view without having to use a mouse!
| Letter |
| View Filter |
| d |
| Day View |
| w |
| Week View |
| t |
| Two-Week View |
| m |
| Month View |
| u |
| Users View |
| p |
| Positions View* |
| j |
| Job Site View* |
| c |
| Coverage View* |
| Letter | View Filter |
| d | Day View |
| w | Week View |
| t | Two-Week View |
| m | Month View |
| u | Users View |
| p | Positions View* |
| j | Job Site View* |
| c | Coverage View* |
*Views not available in Day or Month time view
**Employee users do not have access to view the schedule by Position, Job Site, or Coverage.
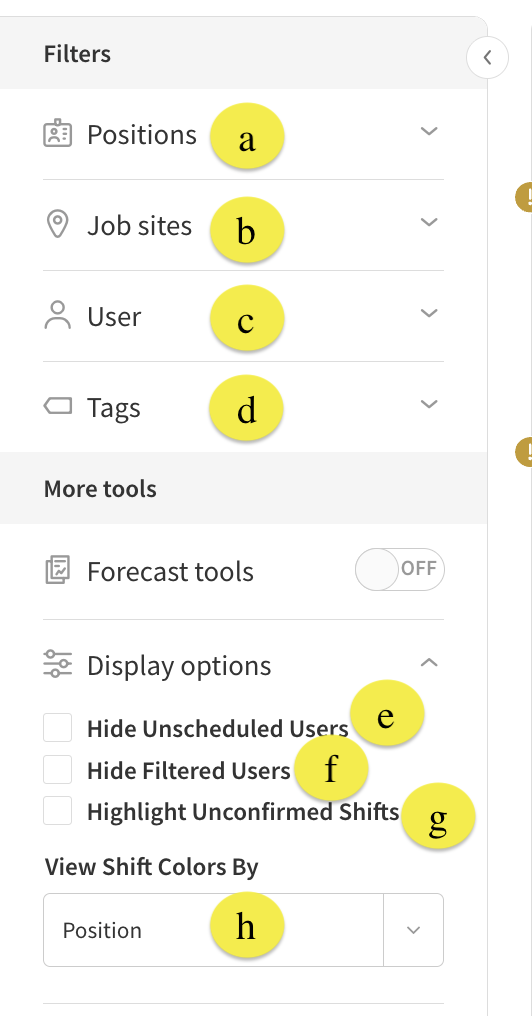
Filters and display options in user view
To reset filters applied to your schedule at any point, click Select All in the Positions or Job Sites menus and Select None in the Tags menu.
| Callout |
| Description |
| a. Positions |
| Use the Positions menu to filter to a specific position or positions. Shifts that don’t match the applied filter appear with a dotted line around them. |
| b. Job Sites |
| Use the Job Sites menu to filter your schedule by job site. Shifts that don’t match your applied job site filters appear with a dotted line around them. |
| c. User |
| Use the User menu to filter to a specific user’s shifts. Every other user on the schedule will be hidden when filtering to an individual. Only that user and the OpenShifts will remain visible. |
| d. Tags |
| Use the Tags menu to filter the schedule by assigned tags.* |
| e. Hide Unscheduled Users |
| Checking the Hide Unscheduled Users box will hide any user that has no assigned shift on the schedule. |
| f. Hide Filtered Users |
| Checking the Hide Filtered Users box will hide any user that does not match the applied filters for position or job site. If they have other shifts that do match, then the unmatched shifts will appear with dotted lines around them instead as normal. |
| g. Highlight Unconfirmed Shifts |
| Checking the Highlight Unconfirmed Shifts box will make shifts that have been confirmed appear faded. This works in tandem with the shift confirmation setting. |
| h. View Shift Colors By |
| Use this dropdown to decide how the colors on your schedule will display. You can set this to Shift, Position, or Job Site. |
| Callout | Description |
| a. Positions | Use the Positions menu to filter to a specific position or positions. Shifts that don’t match the applied filter appear with a dotted line around them. |
| b. Job Sites | Use the Job Sites menu to filter your schedule by job site. Shifts that don’t match your applied job site filters appear with a dotted line around them. |
| c. User | Use the User menu to filter to a specific user’s shifts. Every other user on the schedule will be hidden when filtering to an individual. Only that user and the OpenShifts will remain visible. |
| d. Tags | Use the Tags menu to filter the schedule by assigned tags.* |
| e. Hide Unscheduled Users | Checking the Hide Unscheduled Users box will hide any user that has no assigned shift on the schedule. |
| f. Hide Filtered Users | Checking the Hide Filtered Users box will hide any user that does not match the applied filters for position or job site. If they have other shifts that do match, then the unmatched shifts will appear with dotted lines around them instead as normal. |
| g. Highlight Unconfirmed Shifts | Checking the Highlight Unconfirmed Shifts box will make shifts that have been confirmed appear faded. This works in tandem with the shift confirmation setting. |
| h. View Shift Colors By | Use this dropdown to decide how the colors on your schedule will display. You can set this to Shift, Position, or Job Site. |
* The Tags filter is different than the others. It is an additive filter, meaning when you select more tags, the matching users and shifts MUST contain all tags selected. The more you select, the narrower your scope. Filtering by tags also does NOT update the assigned hours totals in the scheduler.
Other schedule view behaviors
To learn more about how to change the staff views of the schedule, check out the Schedule Views article.
This section will cover the differences in filtering while in views other than User view outlined above.
Position view
All filters remain the same as above, but the display options change when in position view of the schedule. 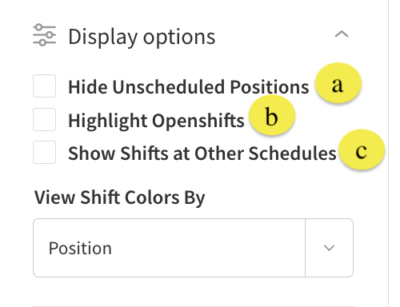
| Callout |
| Description |
| a. Hide Unscheduled Positions |
| Checking this box will hide any position from view that does not have a shift scheduled for it. |
| b. Highlight OpenShifts |
| Checking this box will highlight any available OpenShifts within each position on the schedule. All other shifts will show faded. |
| c. Show Shifts at Other Schedules |
| Checking this box will highlight any shifts that are also scheduled on other schedules. This will only change the view if Labor Sharing is on in the account and a shift has been shared across different schedules. |
| Callout | Description |
| a. Hide Unscheduled Positions | Checking this box will hide any position from view that does not have a shift scheduled for it. |
| b. Highlight OpenShifts | Checking this box will highlight any available OpenShifts within each position on the schedule. All other shifts will show faded. |
| c. Show Shifts at Other Schedules | Checking this box will highlight any shifts that are also scheduled on other schedules. This will only change the view if Labor Sharing is on in the account and a shift has been shared across different schedules. |
Job Site view
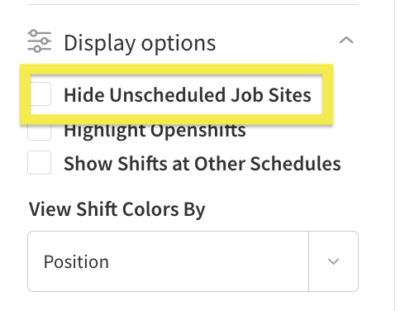
The only change in this view from position view is that the Hide Unscheduled Job Sites appears instead of being able to hide unscheduled positions.
Coverage view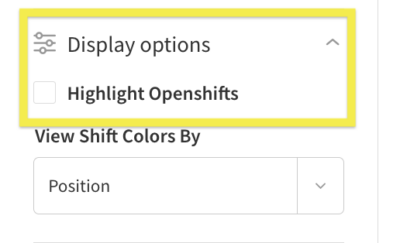
In Coverage view, the only display option available is to highlight any available OpenShifts.
Filtering on the mobile applications
All of the same filters exist on both the Android and iOS applications, however the image below is from the iOS app. Differences will be outlined at the bottom of this article.
- From the When I Work Staff Scheduling app, tap Schedule at the bottom of the screen.
- Tap in the top-left corner to view the filter options.
The filters screen appears.
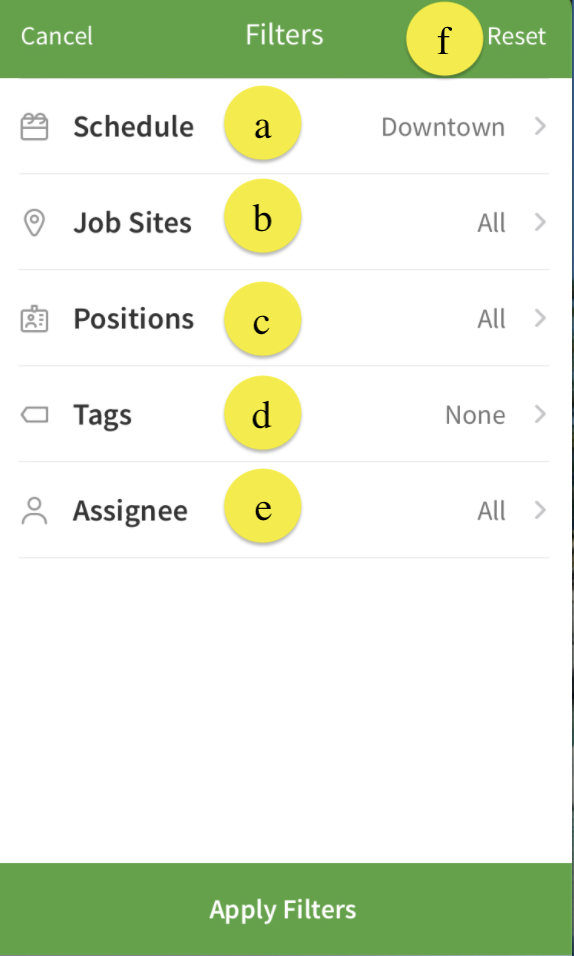
| Callout |
| Description |
| a. Schedule |
| Tap Schedule to filter the shifts by the schedule they are assigned to. |
| b. Job Sites |
| Tap Job Sites to filter shifts by the job site assigned in the shift. |
| c. Positions |
| Tap Positions to select which shifts appear based on position assignment. |
| d. Tags |
| Tap Tags to filter shifts based on assigned tags. |
| e. Assignee |
| Tap Assignee to filter the shifts to a specific user or users’ shifts |
| f. Reset |
| Tap Reset to quickly reset all filters back to default selections. |
| Callout | Description |
| a. Schedule | Tap Schedule to filter the shifts by the schedule they are assigned to. |
| b. Job Sites | Tap Job Sites to filter shifts by the job site assigned in the shift. |
| c. Positions | Tap Positions to select which shifts appear based on position assignment. |
| d. Tags | Tap Tags to filter shifts based on assigned tags. |
| e. Assignee | Tap Assignee to filter the shifts to a specific user or users’ shifts |
| f. Reset | Tap Reset to quickly reset all filters back to default selections. |
Differences in iOS and Android
- The icon is in the top right corner of the Android application.
- When making selections in the filters, you must tap the icon in the top right corner to save each selection in the Android application.
- The Reset Filters option on Android is at the bottom of the screen instead of at the top.