Overview
WorkChat is a secure communication tool that allows you and your staff to send messages and images in real time without exchanging personal contact information. WorkChat can be further customized to fit exactly the type of communication you’d like for your staff to have access to. For example:
- Use in broadcast-only mode so managers can send out one-way messaging to all staff.
- Empower employees to start and post in custom channels to communicate with one another.
You can also use WorkChat from your computer or the iPhone/iPad app. If you have manager or admin access privileges, you can manage WorkChat settings for your workplace.
Channels
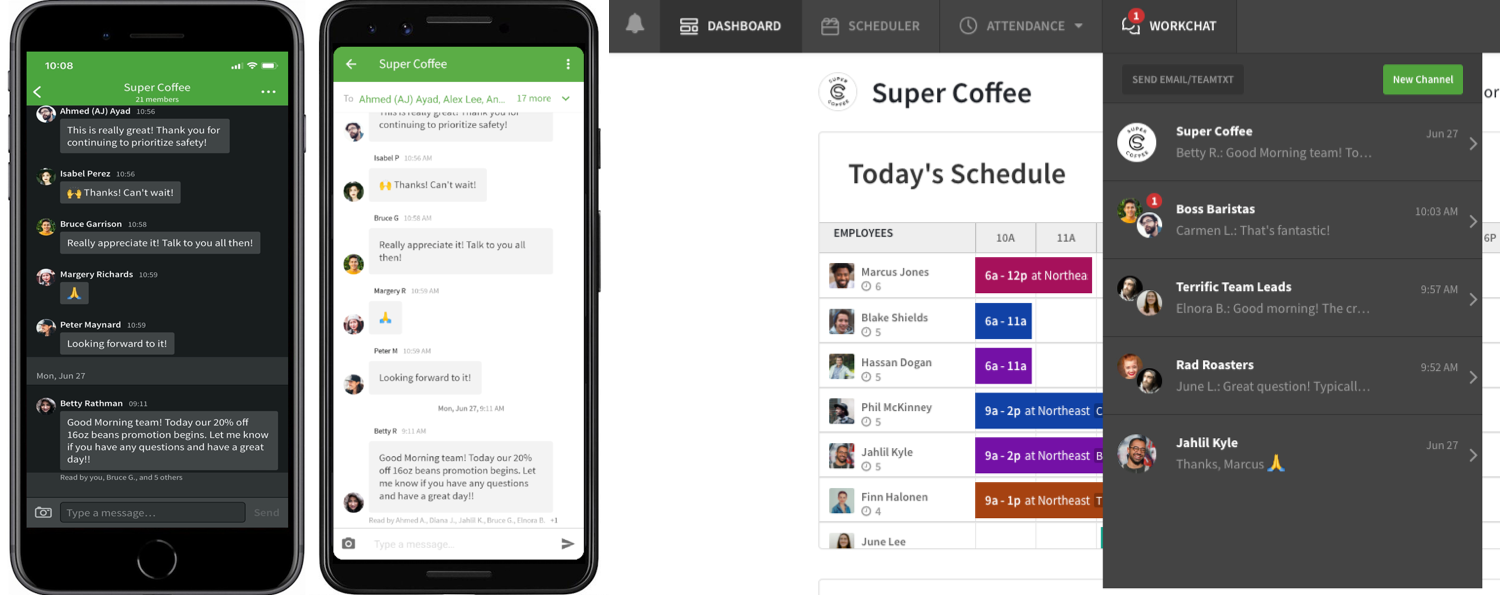
A WorkChat channel is like a virtual room; everyone in the channel can send and receive messages. When you have unread messages, a red dot appears on the channel.
Workplace channel
The workplace channel includes everyone that belongs to the account. Use this channel when you need to send a broadcast message to all of your staff. The workplace channel is pinned to the top of all WorkChat channels and cannot be deleted. By default, only the admin and managers can post in the WorkPlace channel. Adjust your settings to allow other users to post in the channel or contact your employer if you don’t have access to change settings.
In the channels list, the workplace channel shows the account logo and name set by your employer.

Group channels
If enabled on your account, you can create group channels to chat with multiple coworkers. For example, you might create a group channel for team members that work together on a project or work a specific position.

1-on-1 channels
Start a 1-on-1 channel when you need to chat with a specific person.
In the channels list, 1-on-1 channels show the profile picture of the person you’re chatting with.

Using WorkChat to communicate
To access WorkChat, tap Menu button in the top-left corner of the screen, then tap WorkChat icon WorkChat. The app displays your WorkChat channels.
Starting a channel
- From the WorkChat channel list, tap in the bottom-right corner of the screen.
- If you want to give the channel a custom name, tap Channel name (optional) and enter a name.

- Tap next to Members to select the people you want to include in the channel. Tap Select All or Deselect All at the bottom of the screen to check or uncheck all people in your current view.
- To start a 1-on-1 channel, select a single person.
- To start a group channel, select multiple people.
- To filter the list of people by schedule or position, tap .
- To search for a person, tap and begin typing a first or last name.
- Tap Checkmark button in the top-right corner of the screen.
- Send a message to start the channel.
Sending a message
- From the WorkChat channel list, tap an existing channel or create a new one.
- Type a message in the box, then tap Send button.

Your message is delivered to everyone that belongs to the channel. For each message, you can see when the message was sent.
Sending a photo
All WorkChat channels allow you to send photos. PNG, JPEG, and GIF image formats are supported. Images must be 8 MB or less.
- From the WorkChat channel list, tap an existing channel or create a new one.
- Tap Camera icon near the message box.

- Take a new photo or select an existing photo from the gallery.
You may need to allow access to your camera or photo gallery. - If you want to send a message with the photo, type the message in the box.

- Tap Send button.
Your image is sent to everyone that belongs to the channel.
Deleting a message
You can choose to delete a message you sent in a channel.
- Long press on the message until the menu appears.

- Tap Delete Message.
- Tap Delete to confirm.

Copying a message
You can copy the text of a message on your iOS device.
- Long press on the message you want to copy the text of.
- Tap Copy Text.
Renaming a channel
You can rename any group or 1-on-1 channel.
- From the WorkChat channel list, tap the channel you want to rename.
- In the top-right corner of the screen, tap More button.
- Tap Manage Channel.

- Tap the channel name to edit it.

- Enter a new name.
- Tap to apply the changes to the channel.
Adding coworkers to a channel
- From the WorkChat channel list, tap the channel you want to add coworkers to.
- In the top-right corner of the screen, tap More button.
- Tap Manage Channel.
- Tap next to Members.

- Tap each coworker that you want to add.
To search for a person, tap or tap to filter. - Tap Checkmark button in the top-right corner of the screen to apply the changes to the channel.
Removing coworkers from a channel
Admins, managers and supervisors can remove coworkers from channels.
- From the WorkChat channel list, tap the channel you want to add coworkers to.
- In the top-right corner of the screen, tap .
- Tap Manage Channel.
- Tap next to the coworker’s name to remove them.

- Tap Checkmark button to apply the changes to the channel.
Leaving a channel
If you leave a channel, you cannot rejoin it yourself. However, you can ask someone in the channel to add you. You cannot leave the workplace channel.
- From the WorkChat channel list, tap the channel.
- In the top-right corner of the screen, tap More button.
- Tap Leave Channel.

- Tap Leave to confirm.
Viewing notifications
WorkChat notifications let you know that you’ve received messages. The When I Work app must be open to send WorkChat notifications. If a message arrives while you’re not viewing WorkChat, the notification appears as a banner across the top of the screen.
If your device is locked, the notification appears in the Android notification area.
Changing your notification preferences
You can configure notification preferences for WorkChat without changing your notification settings for scheduling or attendance.
- Tap Menu button in the top-left corner of the screen, then tap Profile & Settings.
- Under Alert Preferences, turn on the mobile notification for WorkChat.

- Tap Checkmark button to save.
Can’t see WorkChat?
If you don’t see WorkChat in the When I Work Scheduling app:
- WorkChat may be disabled. Your employer has the option to turn WorkChat on and off.
- You might be using an old version of the app. Make sure you’re using the latest version.