Overview
Changing your view of the schedule helps you better visualize upcoming shifts. The Scheduler offers three types of views:
- Time views determine the time period that you’re viewing.
- Staff views determine the formatting of the schedule.
- Color views determine whether the schedule is colored-coded based on shift colors, position colors, or job site colors.
You can also change schedule views from your Android device or iOS device.
Time views
The Scheduler allows you to view the schedule by week (default), day, 2 weeks, or month. Switch between time views using the view dropdown above the schedule. Click Down icon to switch between Day, Week, 2 Week or Month view.
When you’re viewing a particular day, week, or month:
- Click Left arrow button to go back and Right arrow button to go forward.
- Click Calendar button to jump to a specific day.
- Click Today to return to the current day.
Week view
Click Down icon in the upper-right corner of the Scheduler, then select Week to view and manage the schedule one week at a time.

By default, the week begins on Sunday and ends on Saturday. If you don’t want Sunday as the start day of each week, change the start day of the work week.
If you are a manager or the admin, you can also view your user’s wages as they are scheduled. Enable the Forecast Tools checkbox in the View Options menu to the left of the schedule. See Viewing Labor Costs While Scheduling for more information.
Day view
Click Down icon in the upper-right corner of the Scheduler, then select Day to view and manage the schedule one day at a time. From week or month view, you can click the date at the top of the schedule or in the calendar to switch to a specific day.

Day view also helps you evaluate coverage for a single day. A coverage graph is available at the bottom so you can quickly see how many users you have scheduled during a particular hour of the day.
2 Week view
Click Down icon in the upper-right corner of the Scheduler, then click 2 Week to view and manage the schedule for two weeks at a time.
Month view
Click Down icon in the upper-right corner of the Scheduler, then click Month to view and manage the schedule for an entire month. For more information, see Using Month View.

Staff views
When you’re building the schedule, you can schedule shifts based on users, positions, or coverage. If you prefer to think about who you are scheduling, use users view. If you prefer to think about the position or job that you’re scheduling, use position view instead. Finally, if you like to see shifts in ascending order from start time, use coverage view to ensure your whole workday is being covered.
In the View Options menu to the left of the schedule, use the View Shifts By menu to select Users view, Position view, or Coverage view.

Time view options vary with each staff view. The following time views are available for users, position, and coverage view:
| Day | |
| Users View | |
| Position View | |
| Coverage View | |
| Week | |
| Users View | |
| Position View | |
| Coverage View | |
| 2 Week | |
| Users View | |
| Position View | |
| Coverage View | |
| Month | |
| Users View | |
| Position View | |
| Coverage View |
| Users View | Position View | Coverage View | |
| Day | |||
| Week | |||
| 2 Week | |||
| Month |
Users view
Use users view if you prefer to think about schedule coverage based on who is scheduled. Users view is useful when you want to monitor each user’s hours while creating the schedule.
In users view, OpenShifts appear on their own row, each user gets one row, and user’s availability appears in each cell if they’ve set it up.
To schedule a shift for a particular user, click the day in the row for that user. For more information about scheduling shifts, see Scheduling a Shift.

Position view
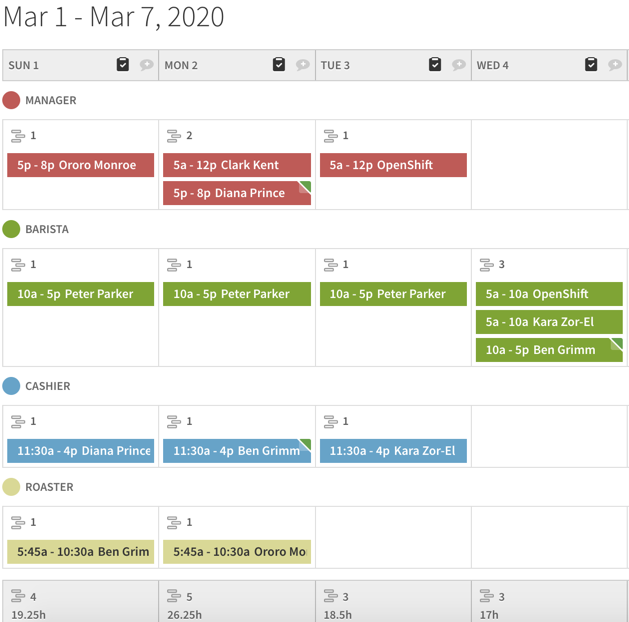
Use position view if you prefer to think about schedule coverage based on which positions need to be filled.
In position view, each position gets one row and a count of shifts. Regular shifts appear in the assigned position row with a label that indicates the assigned user and the hours they are working. OpenShifts appear in the assigned position row with an OpenShift label and the hours for the OpenShift.
User’s availability appears when you add or edit a shift.
To schedule a shift for a particular position, click the day in the row for that position. For more information about scheduling shifts, see Scheduling a Shift.
Coverage view
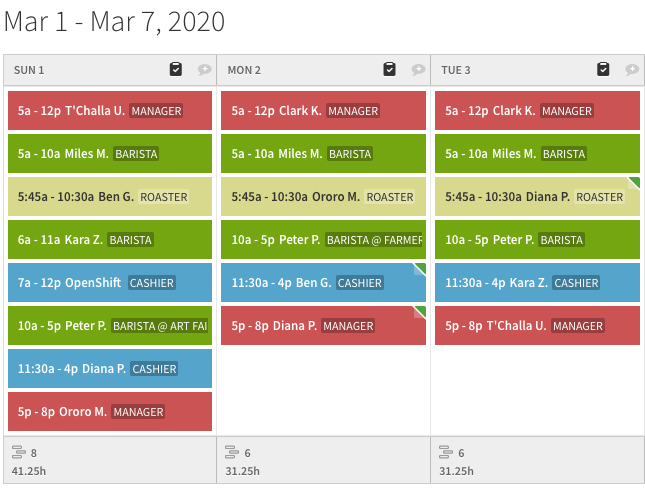
Coverage view displays shifts in chronological order starting from 12a-12p so you can see who is working for the day and at what time. Coverage view is useful when you want to make sure you have an entire day’s worth of shifts covered and determine any gaps for priority shift times.
Each shift block displays the start time, end time, user’s first name, user’s last initial, and position. The total count of shifts and shift hours are displayed in the footer to help ensure total coverage for each day.
To schedule a shift, click the day you’d like to create a shift on. For more information about scheduling shifts, see Scheduling a Shift.
Color views
You can color the schedule based on the colors assigned to the shifts or the colors of the assigned positions. Use the View Shift Colors By dropdown in the View Options menu to switch between color views:

- To view shifts based on the colors assigned to them, select Shift.
- To view shifts based on the colors of their assigned positions, select Position.
- To view shifts based on the colors of job sites assigned to them, select Job Site.